|
|

|
Zundapp KS601 - Solo Seat Frame Repair And Spring Mount Fabrication
|
| |
| |
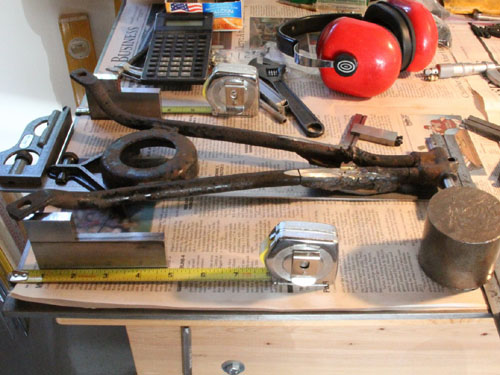
My Zundapp KS601 originally came with a two passenger seat, basically a bench seat. It was just as
ugly as hell. My
guess is that it was damned comfortable, judging by it's very detailed construction, but it looked
like something pulled out of an old pickup truck, cut to size, and cobbled onto the Zundapp.
It had always been my wish to replace it with a solo seat, but there were a few things standing
in my way. The first, potentially, was my wife. While she does not seem to enjoy riding on motorcycles
at all, that doesn't preclude her taking umbrage if I were to modify this one such that she simply
could not. Second, I didn't have a solo seat frame or spring and they are damned expensive, if you
can find them at all.
The first issue resolved itself in the form of the seat being pretty much burnt up in the lightning
strike on my shop. The frame was left intact, and was pretty impressive in sheer quantity of springs
and detailed structure, but a real ass pincher at best with no upholstery. So, now, equipped with a
perfect excuse, all I needed was a solo seat frame I could afford.
|
|
|
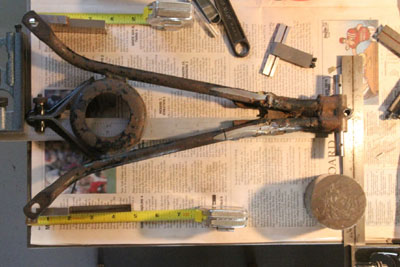
Enter the first annual North American Zundapp Rally held in Spring Valley, Ohio, September of
2013. There I met a very pleasant dude, Michael, who had a little flea market spread of KS601
parts in the barn, and a fabulous elephant green Zundapp KS601 side car rig which you will have
seen on the internet if you have done any research on KS601's at all.
I was relating my desire for a seat frame, but lamenting the prices. I said I really need to
conserve money at this point, being semi-retired and living on my very meager income from rentals,
so I planned on simply making the frame.
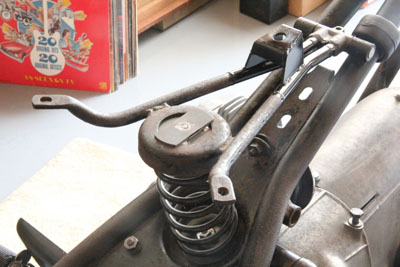
Michael leaned down, rummaged around in his stuff a bit, and produced the unloved solo seat
frame that you see featured in the image to the right. I guess it looked like trash to everyone
else. What I saw was a good pivot forging and spring seat with the rear mounting holes in the
proper location. Who cares about the stuff in between?
|
|
|
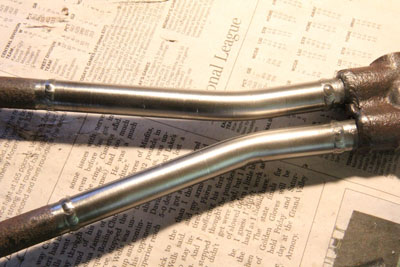
The KS601 solo seat frame from the rally, as found.
|
|
|
|
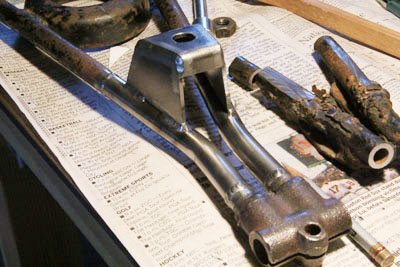
I was a Pratt Whitney certified TIG welder building F-16 afterburners for a number of years. They're
made from tubing of a very similar size to the seat frame, albeit 0.034" wall thickness as opposed
to around 0.110" on the seat frame. No matter. I can weld tubing in my sleep. This frame, which to
everyone else looked like - and was - a horribly abused piece of junk which had then fallen victim
to some skill-less clown's retarded attempt to repair, looked to me like manna from heaven, albeit
the kind you have to bake yourself.
|
|
The Process
|
|
|
|
|
The first order of business was to get some measurements for a baseline. My work bench has
a nice truly square 1/4" steel surface that lends itself very conveniently both to welding
and laying out or measuring stuff.
You see the new pivot pin in place, here. I'll cover that a little way down the page.
The work bench was one of the good things to come out of the fire. It's very stout, with three
4x4 front legs notched deeply into 2x8 frame, two layers of 3/4" 7 layer ply on top, 1/16" of
rubber to dampen any ringing, then the P&O 1/4" plate, all lagged firmly into the cement block
wall with 2x4 legs bolted to the wall and carrying the weight to the floor. It doesn't move. I
mean it. You could literally toss a V8 on top with no complaint from the bench.
|
|
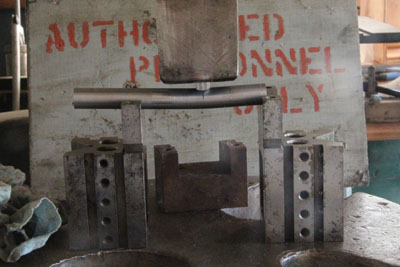
Here's one of the new frame tubes getting a crude bend on my 15 ton Atlas press. The tubing
was 14 mm which I could not find in short lengths anywhere in any material. I didn't know what
the frame was originally fabricated from, but I planned on 4130 as it is apparently a fairly
high stress area.
Since I couldn't find the correct tubing, I bought some 0.625" OD x 0.156" wall thickness
and turned it down to 14 mm. Hadn't machined 4130 before, but I thought it's supposed to
turn pretty nice. It was acting a bit gummy on me, but this was one week before the rally
and I was in near panic mode, so I didn't fiddle around much trying to get a nicer finish
(by way of excuse making for the crappy finish).
The 4130 took quite a bit of oomph to bend. Impressive stuff strength-wise. I actually went
a little past the correct angle, but there was no going back.
|
|
|
|
|
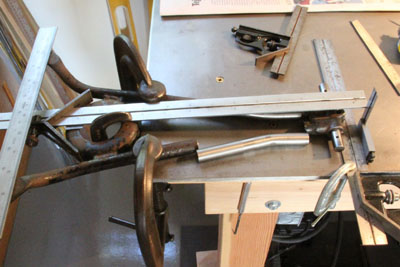
Fitting the last tube in the frame. All the joints got heavily chamfered
after fitting.
|
|
If you aren't familiar with TIG, the welds may look a little light,
but they were deeply chamfered and gapped before stress welding with
4130 filler. If I didn't get 100% penetration I got pretty damned
close. Bottom line, the frame won't break at these welds.
|
|
|
|
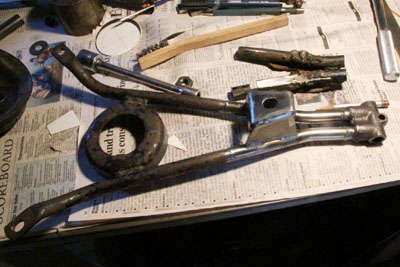
Here's the seat frame nearly finished. Unfortunately, I did not at this point
understand the relationship between the height of the front seat mount and getting
the whole assembly onto the bike.
You have a kind of Catch 22 situation here. You have to put the pivot pin in place
prior to mounting the fuel tank, but then the fuel tank has to fork the seat frame,
so to speak, sliding back into position from the front, and at a steep angle to
clear the handle bars. To do this, the frame has to be up, which raises the front
mount.
|
|
I had chosen the front mount height to make sure the seat would never contact the
frame. Alas, this is too high for the mount to slip into the fuel tank's tunnel.
So with five days to go to the rally, and lots of work yet to be done, I about freaked.
Finally got my shit together and carefully cut the mount off the frame on the correct
line to get the height I needed, cut the remnants off the frame, and welded it all back
together. Now it clears the tank, but my ass hits the frame slightly. Need to improve
this, but later!
|
|
|
|
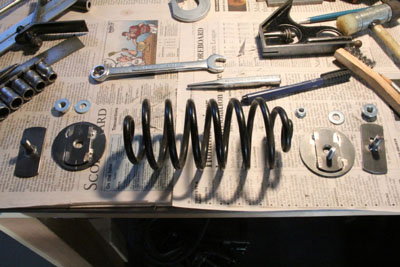
If you know KS601's, you know this ain't the correct seat spring. The correct spring,
when you can find it, costs north of $50. This is a Zundapp Comfort spring. It cost
me $25 delivered. Verified it was about the correct dimension before I bought it, and
having the correct spring rate was a given. Same basic application.
So I needed to adapt the reduced diameter ends to the KS601 seat frame, which is designed
for full coil diameter. Here's the parts to do that, welded up and ready for paint.
|
|
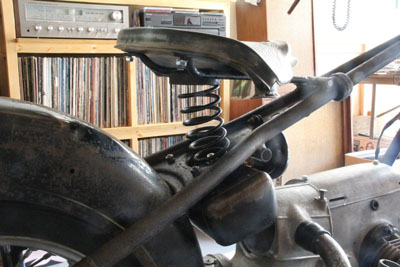
Here's a shot of the finished frame with the spring mounted. This was still before I
discovered the front mount was too high, and after I had painted it all, just to
complicate correcting the mount. Plus, I don't know where I got the gloss black. I
never use gloss. Yuck. Didn't see it till too late.
I was also hoping that capturing the spring would side step the need to make the stop
bolt that keeps the frame from going up far enough to hit the tank. No luck on that.
|
|
|
|
Here's the completed assembly, mounted on the bike. It's 4:00 pm, five days
before the rally, and I'm about to discover that the front mount is too high
for the tank to be fitted in place over it. Pictures, understandably, I think,
became a very low priority at this point. Suffice it to say I had the mount
cut down and rewelded, looking just as nice as originally, before I left the
shop that night.
Too bad, because you can see in the picture that the seat is nicely parallel to
the frame with plenty of clearance. The cut down version, just barely clearing
the tank, brought the front down to where my ass comes lightly into contact
with the frame tubes. Gonna have to do something about that eventually.
Also, ultimately had to make the stop bolt and related mounting tab, otherwise
the seat frame used the rear of the tank as a stop.
|
|
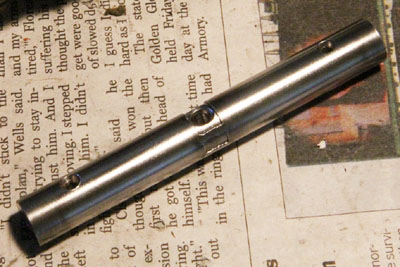
This is the pivot pin. I actually made it first so that I could see how the
frame, as found, fit on the bike and could use it as a datum to make sure
everything came out with the dimensions correct and properly squared up.
I turned a 1/2" Grade 5 bolt down to 12mm to make the pin. Would have preferred a
Grade 8, but this is what I had. The grease zerk pockets into the hole in the middle.
It's connected to the outer holes via a bore down the center of the pin, welded
closed at the ends. The groove in the middle really shouldn't have been there.
Instead of the zerk pocketing into the hole I should have milled a flat for it to
locate the pin and keep it from turning.
The poorly conceived groove would have leaked grease out the split in the seat frame
pivot forging. The split allows a screw to clamp the pivot pin. The two welds across
the groove, carefully turned down to the OD of the pin, pretty effectively isolate
the groove from the split to keep that from happening. The pin fits the forging and
frame trunnions very closely, which retains the grease.
|
|
|
Last updated 11-16-17
Email:
mechanique at wmol dot com
|

|
|
|